JSON to JMX Converter

Free Tool
Popular

Convert a Postman Collection (exported as JSON) into a ready-to-run JMeter JMX test plan — HTTP samplers, headers, auth, and folders included.

Converters

Upload collection

Click or drag & drop a file

Exported Postman Collection (.json)

Maximum size: 100 MB

JMX Output

Your converted JMeter test plan will appear here.


What is the JSON to JMX Converter?

The JSON to JMX Converter turns a Postman Collection, exported as a JSON file, into an Apache JMeter test plan (a .jmx file). If your team already has API requests in Postman, you can reuse them for performance testing instead of rebuilding every request, header and body in JMeter by hand.

How it works

Export a collection from Postman as JSON (Collection v2.1), then upload the file here (up to 100 MB). Each request becomes an HTTP Sampler, folders become Simple Controllers, and headers, auth (Basic/Bearer/API Key/OAuth 2.0), and request bodies (raw JSON/XML, form-urlencoded, form-data) are carried over — along with Postman variables ({{variable}}), which are converted to JMeter variables (${variable}).

Formula to convert a Postman collection to JMX

Collection → Test Plan (+ Thread Group: 1 thread, 1 loop) Collection vars → User Defined Variables Folder → Simple Controller Request → HTTP Request sampler Headers → HTTP Header Manager Raw body → Body Data (Content-Type auto-detected) Auth → Authorization header / API key parameter {{variable}} → ${variable}

Where:

  • CollectionThe Postman collection name becomes the Test Plan name.
  • FolderEach Postman folder becomes a Simple Controller that keeps the same hierarchy.
  • RequestMethod, protocol, host, port, path and query parameters are mapped onto an HTTP Request sampler.
  • Raw bodyJSON is pretty-printed; Content-Type is set to JSON, XML or text if the request does not already have one.
  • AuthBasic, Bearer, OAuth 2.0 (access token) and API Key auth are carried over.
  • ListenersView Results Tree and Summary Report are added so you can run the plan right away.

Example of JSON to JMX conversion

A Postman collection named "Shop API" has a folder "Auth" with a login request, and a products request that uses a token variable.

Inputs

  • Collection: Shop API with collection variable baseUrl
  • Folder AuthPOST {{baseUrl}}/login with a raw JSON body
  • GET {{baseUrl}}/products?page=1 with Bearer token {{token}}

Step-by-step

  1. The Test Plan is named Shop API and baseUrl is added to User Defined Variables
  2. The Auth folder becomes a Simple Controller that holds a Login HTTP Request (POST) with its JSON body and Content-Type: application/json
  3. The products request becomes a GET HTTP Request with the parameter page=1 and header Authorization: Bearer ${token}
  4. Every {{variable}} is rewritten as ${variable}

Result: You download a .jmx file that opens directly in JMeter with the same structure as the Postman collection.

Common mistakes to avoid

  • Exporting a Postman environment instead of a collection — this converter expects a collection JSON (with info and item properties), not environment variables.

  • Expecting form-urlencoded or form-data bodies to carry over on non-GET requests — check the converted JMX before running a large suite, since some request bodies may need to be re-attached manually.

  • Forgetting to resolve Postman variables into JMeter User Defined Variables or a CSV Data Set Config before running the test plan.


How To Convert Json to JMX File

1. Introduction

This user manual provides a complete step-by-step guide for converting a Postman collection (exported in JSON format) into a JMeter-compatible JMX file.

This tool simplifies the process of reusing your Postman API tests inside JMeter, allowing for efficient performance testing without recreating each API call manually.

2. System Requirements

For Web Tool (Converter)

  • Web Browser: Latest version of Chrome, Firefox, or Edge
  • Internet Access: Required to access the online tool
  • File: Postman Collection in JSON format

For JMeter

  • Apache JMeter: Version 5.0 or above (Recommended: 5.6.2)
  • Java: JDK 8 or newer installed and configured
  • Memory: Minimum 2 GB RAM, Recommended 4+ GB for large test plans
  • OS: Windows, macOS, or Linux

3. Export JSON from Postman

  1. Open Postman on your machine
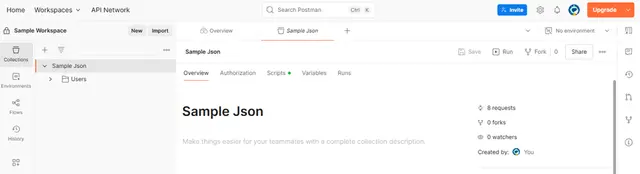
  2. Go to the Collections tab
Postman Collections tab showing the Sample Json collection
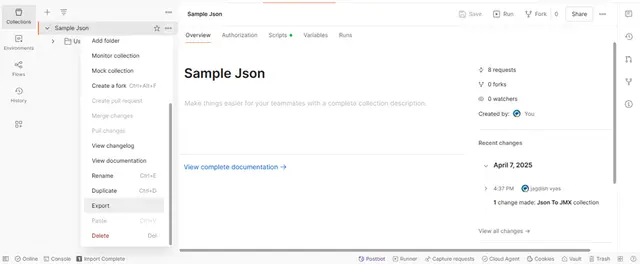
  1. Click the three-dot menu (⋮) next to the collection you want to convert
  2. Choose Export
Postman collection three-dot menu with the Export option
  1. In the export options, select Collection v2.1 (recommended)
  2. Click Export and save the file (e.g., MyCollection.json) to your computer
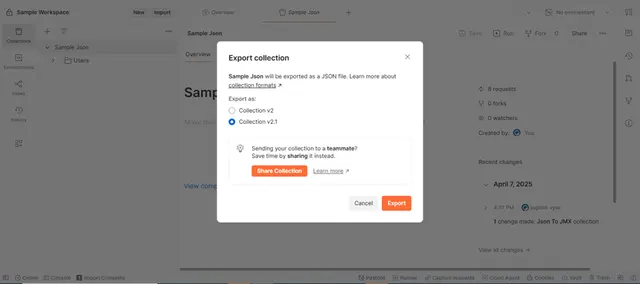
Postman Export collection dialog with Collection v2.1 selected

4. Upload JSON into the Converter Tool

  1. Open your browser and navigate to: https://baseline11.com/free-tools/json-to-jmx
  2. Click on Click or drag & drop a file in the upload area (or drop your file onto it)
  3. Select your exported JSON file from your computer
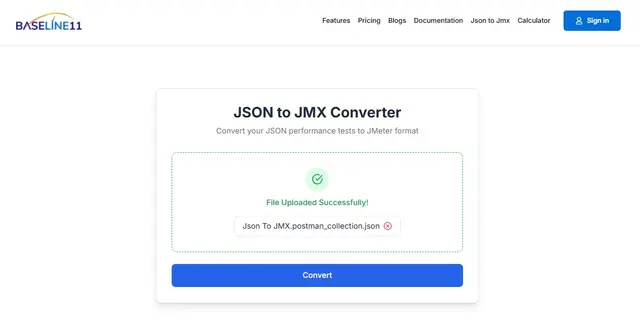
JSON to JMX Converter with a Postman collection file uploaded successfully

The upload process prepares your Postman collection for conversion.

5. Convert JSON to JMX

  1. After uploading, click the Convert button
  2. The tool parses your JSON file and creates a JMX test plan
  3. You will be prompted with a Download JMX File button once the conversion is complete

What gets converted?

  • Requests: All HTTP requests (GET, POST, PUT, DELETE, etc.)
  • Headers: Custom headers from Postman are added to JMeter samplers
  • Bodies: Raw JSON/text bodies in requests are preserved
  • Assertions: Basic assertions like status code checks may be included

6. Download JMX File

  • Click the Download JMX File button to save the generated .jmx file to your system
  • The downloaded file is ready to be opened in JMeter for execution or further editing

7. Upload into Apache JMeter

  1. Open Apache JMeter
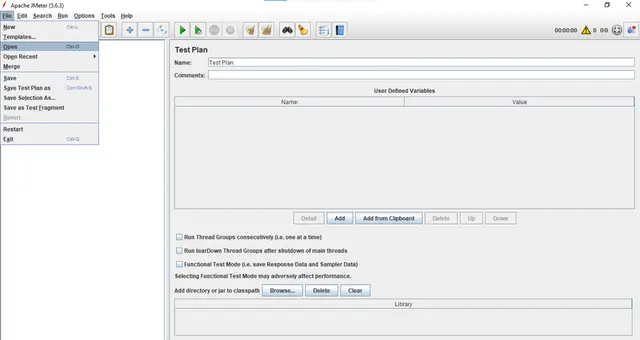
  2. Go to File → Open
Apache JMeter File menu with the Open option highlighted
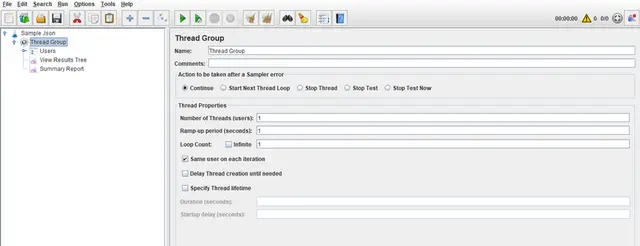
  1. Locate the downloaded .jmx file
  2. Open it to load the test plan
Converted JMX test plan loaded in Apache JMeter showing the Thread Group

Now you can:

  • Modify parameters
  • Add listeners, assertions, timers
  • Execute the test and analyze performance

8. Best Practices and Tips

  • Always verify the JMX file: Ensure headers, payloads, and endpoints are correct
  • Group by folder in Postman before exporting if you want logical thread groups in JMeter
  • Use JMeter Variables to make dynamic tests easier after import
  • Use JMeter Assertions to enhance reliability and test validations
  • Run with 1 thread first to validate functionality before load testing

9. Troubleshooting

JMX file won't load in JMeter

  • Ensure your Postman collection was exported in v2.1 format
  • Re-export the collection and try the conversion again

Missing endpoints or headers in JMX

  • Make sure your Postman collection contains all required folders, requests, headers, and body content
  • Verify the completeness of your Postman export before converting

JMeter throws error during test start

  • Review the test plan in JMeter GUI to check for misconfigurations
  • Ensure all necessary JMeter plugins are installed
  • Check each HTTP Sampler and configuration element for syntax or logical errors

Requests not behaving as expected

  • Validate the API endpoints manually using Postman or curl
  • Check if dynamic data or authorization tokens are needed and configure accordingly in JMeter

Test data or parameters missing

  • Confirm if CSV files or external data were originally used in Postman
  • JMeter does not automatically convert external data references — you may need to reconfigure CSV Data Set Config manually

Need advanced performance testing?

Run this scenario at real scale with Baseline11's distributed load testing platform.

Explore Baseline11